
Happy Mother's Day
Happy Mother's Day to my Mum, to my Mother in Law (who is lucky enough to find herself in sunny...? or is it... London) and to my Grandma (GG) and to Nanna (Gran Nan) and to everyone else who is a mum, but especially special to me are these women. Know that you are loved and appreciated not just on Mother's Day, but every day. I love you for being such wonderful role models, for guiding my path in life but also allowing me to choose my way, and mostly, for showing such love to each and every of your children, grandchildren, great grandchildren!
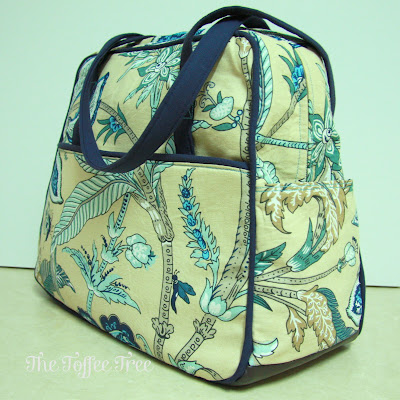
My Mum is extremely lucky to have taught me to sew. Her Mother's Day gift from me this year is this Michelle-made bag. I've had the fabric and pattern for this since November, so it missed her birthday and Christmas and I finished it just in time for Mother's Day.
The bag... it's the Amy Butler Weekender Travel Bag.
I spent well over an hour cutting it out. If you cut all the pieces, and correctly the first time, you can probably avoid the 'well over' bit. Then, say, an hour making piping and the handles. An hour ironing interfacing on. It wasn't as nightmarish to sew, as I had read to believe. Just go slow, try to be precise and use a heavy duty needle. And, definately don't try to finish it all in one weekend, if you have children to feed, a house to clean (OK so mine isn't always so clean) and a husband to keep happy (so I have to clean up a bit). I spread this project out over a leisurely two or three weeks, just doing an hour here and there. I was ecstatic with the result. I want one myself now. I'm sure I could find a place to go, to need one.
I added in a lot of pockets, while I was supposed to be doing kids clothes week sewing. You may recall me mentioning 'other pockets' (or not). These were those 'other pockets'. I added a whole darn lot to this bag. A 10 hour bag, so they say. That's 10 hours without these pockets. Well, perhaps if you have no "mummy I'm hungry's" you might get through it.
I added a small pen pocket in one outside end pocket, plus a little loop for keys or something. I meant to put one inside too, but forgot.

I also put in a zippered pouch to the bag lining, with this tutorial. So simple really, I don't know why I've been putting off finishing my purse which I started, oh, some 12 months ago. It's in that 'to be finished' box, box #2 of 2. That's right, because I wanted to put a zippered section in it and didn't know how! Easy peasy.

Plus an inside pocket, big enough for an iPad, or magazines in one section and kindle (or perhaps a block of chocolate) in the other section. I also added a couple of pockets in the main print to the inside for pens, note pads or other random bits and pieces. It's like a pocket on a pocket.


I first saw this bag on Pinterest and shelved the idea because I had no idea what Peltex or Timtex were for part of the interfacing and stiffening the bag. Still not 100% sure really. I used bag felt batting. Milly from Tin Whistle she quilted her bag and just used cotton batting, but I think that would have taken me a fair bit of time since I'm rather inexperienced with quilting. She did mentioned adding pockets, so I did.
I was very impressed with myself cutting the outer pockets and matching the print up so perfectly!!

I made the straps longer, as advised by Milly. I put magnetic clasps on the outer pockets and am so glad I did. They would gape terribly without them. I also put faux leather on the base of the bag, so it wouldn't get quite so grubby. I would have put bag feet on too, except the ones I had were minature.
I wasn't so happy with the topstitching on the outer pockets. I had thread tension issues, which I worked out when I was finally stitching the zipper in place. Don't put the topstitch thread on the bobbin too. Is that like some sort of der-Fred moment?! There was no way I was going back from there. Mum won't mind a bit of wonkiness. The zipper was hand stitched to the lining. I completely impressed myself, but this was an hour of work, on top of the 10hours after the cutting and ironing and piping.
I'm pretty sure the only other way I could better this bag, is to have put a zipper with two zipper pulls in. I could have got two when I bought the length of zip from Spotlight, but didn't really think about it way back then.
I'm sure my Mum will get loads of use out of this bag.


Comments
Post a Comment
Your comments make my day!